
Working with Swift is great, it prevents problems at runtime (hence the term “type-safe language”), code is generally more legible, and it forces you to deal with errors. Whether you like it or not, as a Swift Developer, you will eventually have to work with Objective-C. There are countless frameworks / Cocoapods still only available in Objective-C. For example, I had to utilize a Bridging Header file in order to implement Google Sign-In on the CareerSpark application I’m working on. Let’s dive a bit deeper.
What is a Bridging Header file?
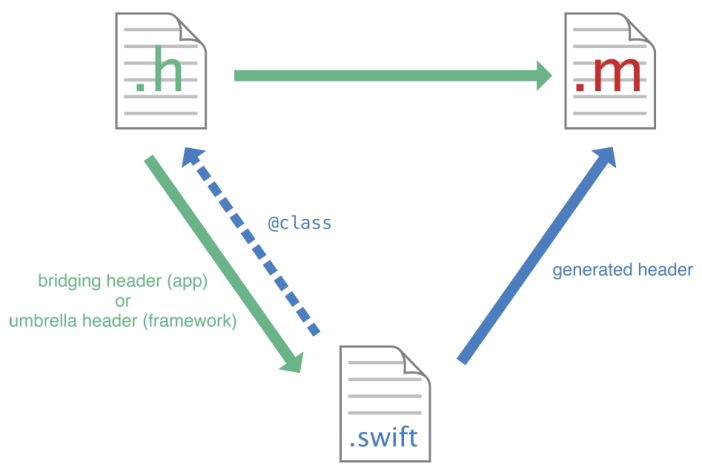
A Bridging Header file is what allows you to import Objective-C frameworks and makes all of the tools that come with them available for you in Swift. If you reference the image above, it shows how the Bridging Header file makes the frameworks (umbrella header) available and how your Swift code is referenced back to the Bridging Header File as a .m file. If you’ve never worked with Objective-C before, this may be a bit difficult to understand but here’s a quick overview:
- Objective-C requires two files, a Header (.h) & Implementation (.m) file, for each Class you create.
- With Swift, there’s only one file per Class.
- The Bridging Header file is how you “trick” Swift into thinking it’s one Class file is split into two.
Creating a Bridging Header File
Generally speaking, creating a Bridging Header file is relatively easy & straightforward, first, in your Xcode project, Command + N to create a new file & select Objective-C Header File:

Now what you name your file is very important, to keep it simple, name it something like “Your-Project-Name-Bridging-Header.h”. IMPORTANT: You can decide to put whatever you want where it says “Your-Project-Name” however the “-Bridging-Header.h” is absolutely necessary! If all goes well, you will get this notification:

If you get that notification, select “Create Bridging Header” & you’ve got your Bridging Header file setup ready to import frameworks! However, Developers, how often do things go right? Exactly, they never do, otherwise there may not be a need for us! So if the notification in the image above DOESN’T come up, here’s what you do:
- Click on your project file (the blue paper looking icon at the top of your groups in the Navigator area on the left side)
- Ensure the correct target is selected
- Click on Build Settings in the Editor Area
- Scroll down until you see “Swift Compiler – Code Generation”
- Click the plus sign (+) to add “Objective-C Bridging Header” and enter the name of the file exactly as you named it.

Importing Frameworks
Last but definitely not least, once you’ve actually created & properly configured the Bridging Header file, it’s time to bring in those frameworks. Exactly what you’re going to put into your Bridging Header file all depends on what you want to use. Here, I’m going to show you two Objective-C frameworks I had to import in order to get Google Sign-In to function as well as this customizable USA map Cocoapod:

For more information on mix & matching Objective-C with Swift please refer to Apple’s Documentation. If you’re interested in the USStatesColorMap please check out my friend & CareerSpark partner’s blog post.
